分布式事务Seata零基础入门
1. Seata简介
1.1 Seata是什么?
Seata 是一款开源的分布式事务解决方案,致力于提供高性能和简单易用的分布式事务服务。Seata 将为用户提供了 AT、TCC、SAGA 和 XA 事务模式,为用户打造一站式的分布式解决方案。
Seata分为
服务端和客户端,服务端直接官网下载,客户端即为各个微服务模块。
1.2 术语介绍
# XID (Transaction ID)
	全局唯一的事务ID
# TC (Transaction Coordinator) - 事务协调者
	维护全局和分支事务的状态,驱动全局事务提交或回滚。
# TM (Transaction Manager) - 事务管理器
	定义全局事务的范围:开始全局事务、提交或回滚全局事务。
# RM (Resource Manager) - 资源管理器
	管理分支事务处理的资源,与TC交谈以注册分支事务和报告分支事务的状态,并驱动分支事务提交或回滚。
- TM 向 TC 申请开启一个全局事务,全局事务创建成功并生成一个全局唯一的 XID;
- XID 在微服务调用链路的上下文中传播;
- RM 向 TC 注册分支事务,将其纳入 XID 对应全局事务的管辖;
- TM 向 TC 发起针对 XID 的全局提交或回滚决议;
- TC 调度 XID 下管辖的全部分支事务完成提交或回滚请求。
2. Seata服务端的安装和启动
- 下载
- 地址:https://github.com/seata/seata/releases
- 将安装包放到/opt目录下并解压
> tar -zxvf seata-server-1.4.0.tar.gz- 修改conf目录下的file.conf配置文件
- 修改测试用的自定义事务组名称,这一段新版本里没有,需要在官网复制,地址查看
README-zh.md
service {
  #transaction service group mapping
  vgroupMapping.my_test_tx_group = "default"
  default.grouplist = "127.0.0.1:8091"
  enableDegrade = false
  disableGlobalTransaction = false
}- 修改事务日志存储模式为db,修改数据库连接信息
store {
  #修改mode为db
	mode = "db"
	db {
    datasource = "druid"
    dbType = "mysql"
  	#如果安装的是mysql8.0,则需修改驱动
    driverClassName = "com.mysql.cj.jdbc.Driver"
    url = "jdbc:mysql://127.0.0.1:3306/seata"
    user = "root"
    password = "Lmg12580"
    minConn = 5
    maxConn = 30
    globalTable = "global_table"
    branchTable = "branch_table"
    lockTable = "lock_table"
    queryLimit = 100
  }
}- 修改registry.conf配置文件,指明注册中心为Nacos
registry {
  #修改类型为nacos
  type = "nacos"
  loadBalance = "RandomLoadBalance"
  loadBalanceVirtualNodes = 10
  #修改nacos连接信息
  nacos {
    application = "seata-server"
    serverAddr = "127.0.0.1:8848"
    group = "SEATA_GROUP"
    namespace = ""
    cluster = "default"
    username = "nacos"
    password = "nacos"
  }
}- 新建数据库seata,初始化db_store.sql
- sql地址:https://github.com/seata/seata/blob/develop/script/server/db/mysql.sql
- 执行完后,会出现三张表
- global_table
- branch_table
- lock_table
- 启动Nacos后,进入bin目录启动seata-server
> sh seata-server.sh
# 看到以下内容则说明启动成功
16:34:54.562  INFO --- [                     main] io.seata.config.FileConfiguration        : The file name of the operation is file.conf
16:34:54.562  INFO --- [                     main] io.seata.config.FileConfiguration        : The configuration file used is file.conf
16:34:55.987  INFO --- [                     main] com.alibaba.druid.pool.DruidDataSource   : {dataSource-1} inited
16:34:56.351  INFO --- [                     main] i.s.core.rpc.netty.NettyServerBootstrap  : Server started, listen port: 8091
3. Seata的分布式交易解决方案

接下来按照此模型来学习Seata >>>
我们需要创建三个服务:订单服务、库存服务、账户服务
① 当用户下单时,会在订单服务中创建一个订单;
② 然后通过远程调用库存服务来扣减下单商品的库存;
③ 再通过远程调用账户服务来扣减用户账户里面的余额;
④ 最后再订单服务中修改订单状态为已完成。
下单操作会跨越三个数据库,有两次远程调用,很经典的分布式事务问题。
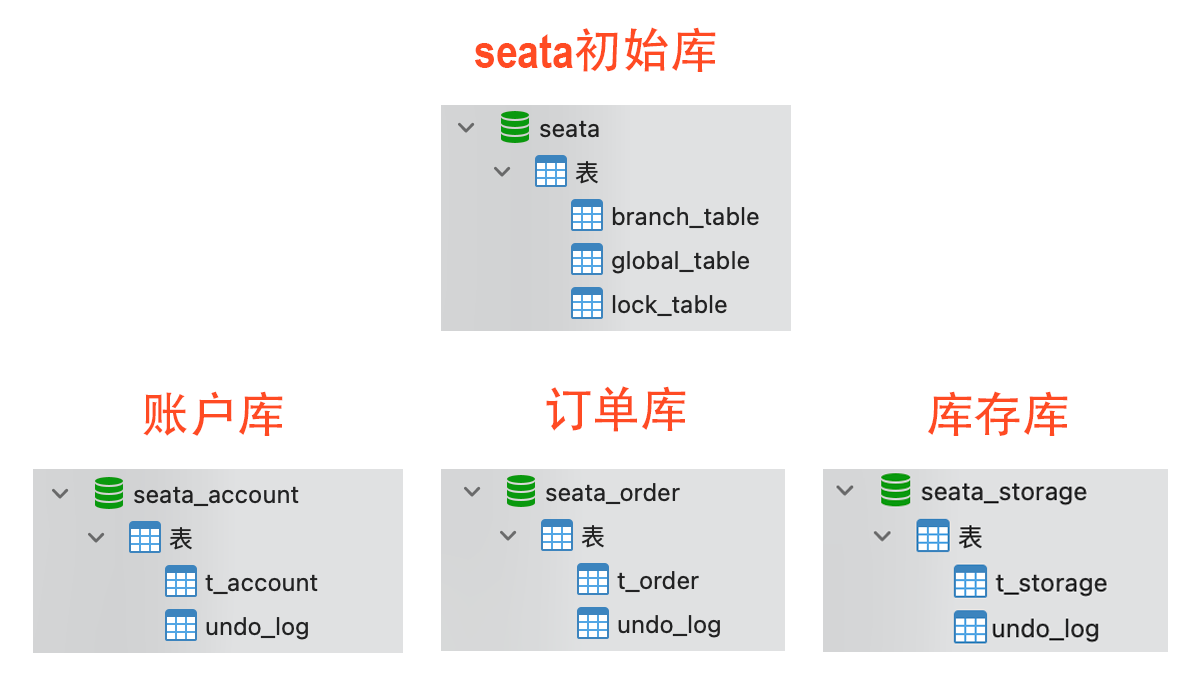
3.1 业务数据库准备
- seata_order:存储订单的数据库。表:t_order
CREATE TABLE t_order(
	`id` BIGINT(11) NOT NULL AUTO_INCREMENT PRIMARY KEY,
	`user_id` BIGINT(11) DEFAULT NULL COMMENT '用户id',
	`product_id` BIGINT(11) DEFAULT NULL COMMENT '产品id',
	`count` INT(11) DEFAULT NULL COMMENT '数量',
	`money` DECIMAL(11,0) DEFAULT NULL COMMENT '金额',
	`status` INT(1) DEFAULT NULL COMMENT '订单状态:0:创建中;1:已完结'
)- seata_storage:存储库存的数据库。表:t_storage
CREATE TABLE t_storage(
	`id` BIGINT(11) NOT NULL AUTO_INCREMENT PRIMARY KEY,
	`product_id` BIGINT(11) DEFAULT NULL COMMENT '产品id',
	`total` INT(11) DEFAULT NULL COMMENT '总库存',
	`used` INT(11) DEFAULT NULL COMMENT '已用库存',
	`residue` INT(11) DEFAULT NULL COMMENT '剩余库存'
)
INSERT INTO seata_storage.t_storage(`id`,`product_id`,`total`,`used`,`residue`)
VALUES('1','1','100','0','100');- seata_account:存储账户信息的数据库。表:t_account
CREATE TABLE t_account(
	`id` BIGINT(11) NOT NULL AUTO_INCREMENT PRIMARY KEY,
	`user_id` BIGINT(11) DEFAULT NULL COMMENT '用户id',
	`total` DECIMAL(10,0) DEFAULT NULL COMMENT '总额度',
	`used` DECIMAL(10,0) DEFAULT NULL COMMENT '已用额度',
	`residue` DECIMAL(10,0) DEFAULT '0' COMMENT '余额'
)
INSERT INTO seata_account.t_account(`id`,`user_id`,`total`,`used`,`residue`)
VALUES('1','1','1000','0','1000');
除以上业务表之外,各业务表还需创建对应的回滚日志表undo_log.sql:
sql地址:https://github.com/seata/seata/edit/develop/script/client/at/db/mysql.sql
最终效果:
3.2 工程准备
- 新建seata-order-service订单服务
- 修改pom文件,添加seata相关依赖
<dependency>
    <groupId>com.alibaba.cloud</groupId>
    <artifactId>spring-cloud-starter-alibaba-seata</artifactId>
    <exclusions>
        <exclusion>
            <groupId>io.seata</groupId>
            <artifactId>seata-all</artifactId>
        </exclusion>
        <!--不加这个启动会报错找不到seataDataSourceBeanPostProcessor-->
        <exclusion>
            <groupId>io.seata</groupId>
            <artifactId>seata-spring-boot-starter</artifactId>
        </exclusion>
    </exclusions>
</dependency>
<dependency>
    <groupId>io.seata</groupId>
    <artifactId>seata-all</artifactId>
    <version>1.4.0</version>
</dependency>
<dependency>
    <groupId>io.seata</groupId>
    <artifactId>seata-spring-boot-starter</artifactId>
    <version>1.4.0</version>
</dependency>- 修改yml文件,添加基础配置
server:
  port: 2001
spring:
  application:
    name: seata-order-service
  cloud:
    nacos:
      discovery:
        server-addr: localhost:8848
  datasource:
    type: com.alibaba.druid.pool.DruidDataSource
    driver-class-name: com.mysql.jdbc.Driver
    url: jdbc:mysql://localhost:3306/seata_order
    username: root
    password: Lmg12580
mybatis:
mapper-locations: classpath:mapper/*.xml- 编写相关业务类,domain/dao/service/controller
- 核心业务类OrderServiceImpl.java
@Service
@Slf4j
public class OrderServiceImpl implements OrderService {

    @Resource
    private OrderDao orderDao;
    @Resource
    private StorageService storageService;
    @Resource
    private AccountService accountService;

    @Override
    public void create(Order order) {
        log.info("---新建订单--->");
        orderDao.create(order);

        log.info("---订单微服务开始调用库存,做扣减Count--->");
        storageService.decrease(order.getProductId(), order.getCount());

        log.info("---订单微服务开始调用账户,做扣减Money--->");
        accountService.decrease(order.getUserId(), order.getMoney());

        log.info("---修改订单状态--->");
        orderDao.update(order.getUserId(), 0);

        log.info("下单成功(^_^)v");
    }
}- 参照以上方式,新建seata-storage-service库存服务
- 参照以上方式,新建seata-account-service账户服务
4. Seata客户端的配置
4.1 使用文件作为配置中心
将file.conf和registry.conf复制到resources目录下
yml文件添加事务组配置
seata:
	# 自定义的事务组名称
  tx-service-group: my_test_tx_group
其他两个服务也按照此方式配置
启动三个服务,启动完成后,在seata-server后台log能看到注册信息
4.2 使用Nacos作为配置中心
- 在Nacos控制台新建seata命名空间
- 修改服务端registry.conf文件并重启
config {
  # 配置中心改为nacos
  type = "nacos"
  nacos {
    serverAddr = "127.0.0.1:8848"
    namespace = "a02ea230-9d39-4392-89f2-04f5fc0684c0"
    group = "SEATA_GROUP"
    username = "nacos"
    password = "nacos"
  }
}- 客户端yml文件加入对应的配置中心
seata:
  enabled: true
  tx-service-group: default
  # 配置中心
  config:
    type: nacos
    nacos:
      namespace: a02ea230-9d39-4392-89f2-04f5fc0684c0
      serverAddr: localhost:8848
      group: SEATA_GROUP
      username: "nacos"
      password: "nacos"
      cluster: default
  # 注册到seata-server服务端
  registry:
    type: nacos
    nacos:
      application: seata-server
      server-addr: localhost:8848
      group : DEFAULT_GROUP
      username: "nacos"
      password: "nacos"
      cluster: default
配置中心脚本初始化之前会读取
config.txt文件,顾需先下载:config.txt地址:https://github.com/seata/seata/edit/develop/script/config-center/config.txt
下载完成后放在服务端seata目录下
下载nacos-config.sh脚本,放在bin目录下
脚本地址:https://github.com/seata/seata/blob/develop/script/config-center/nacos/nacos-config.sh
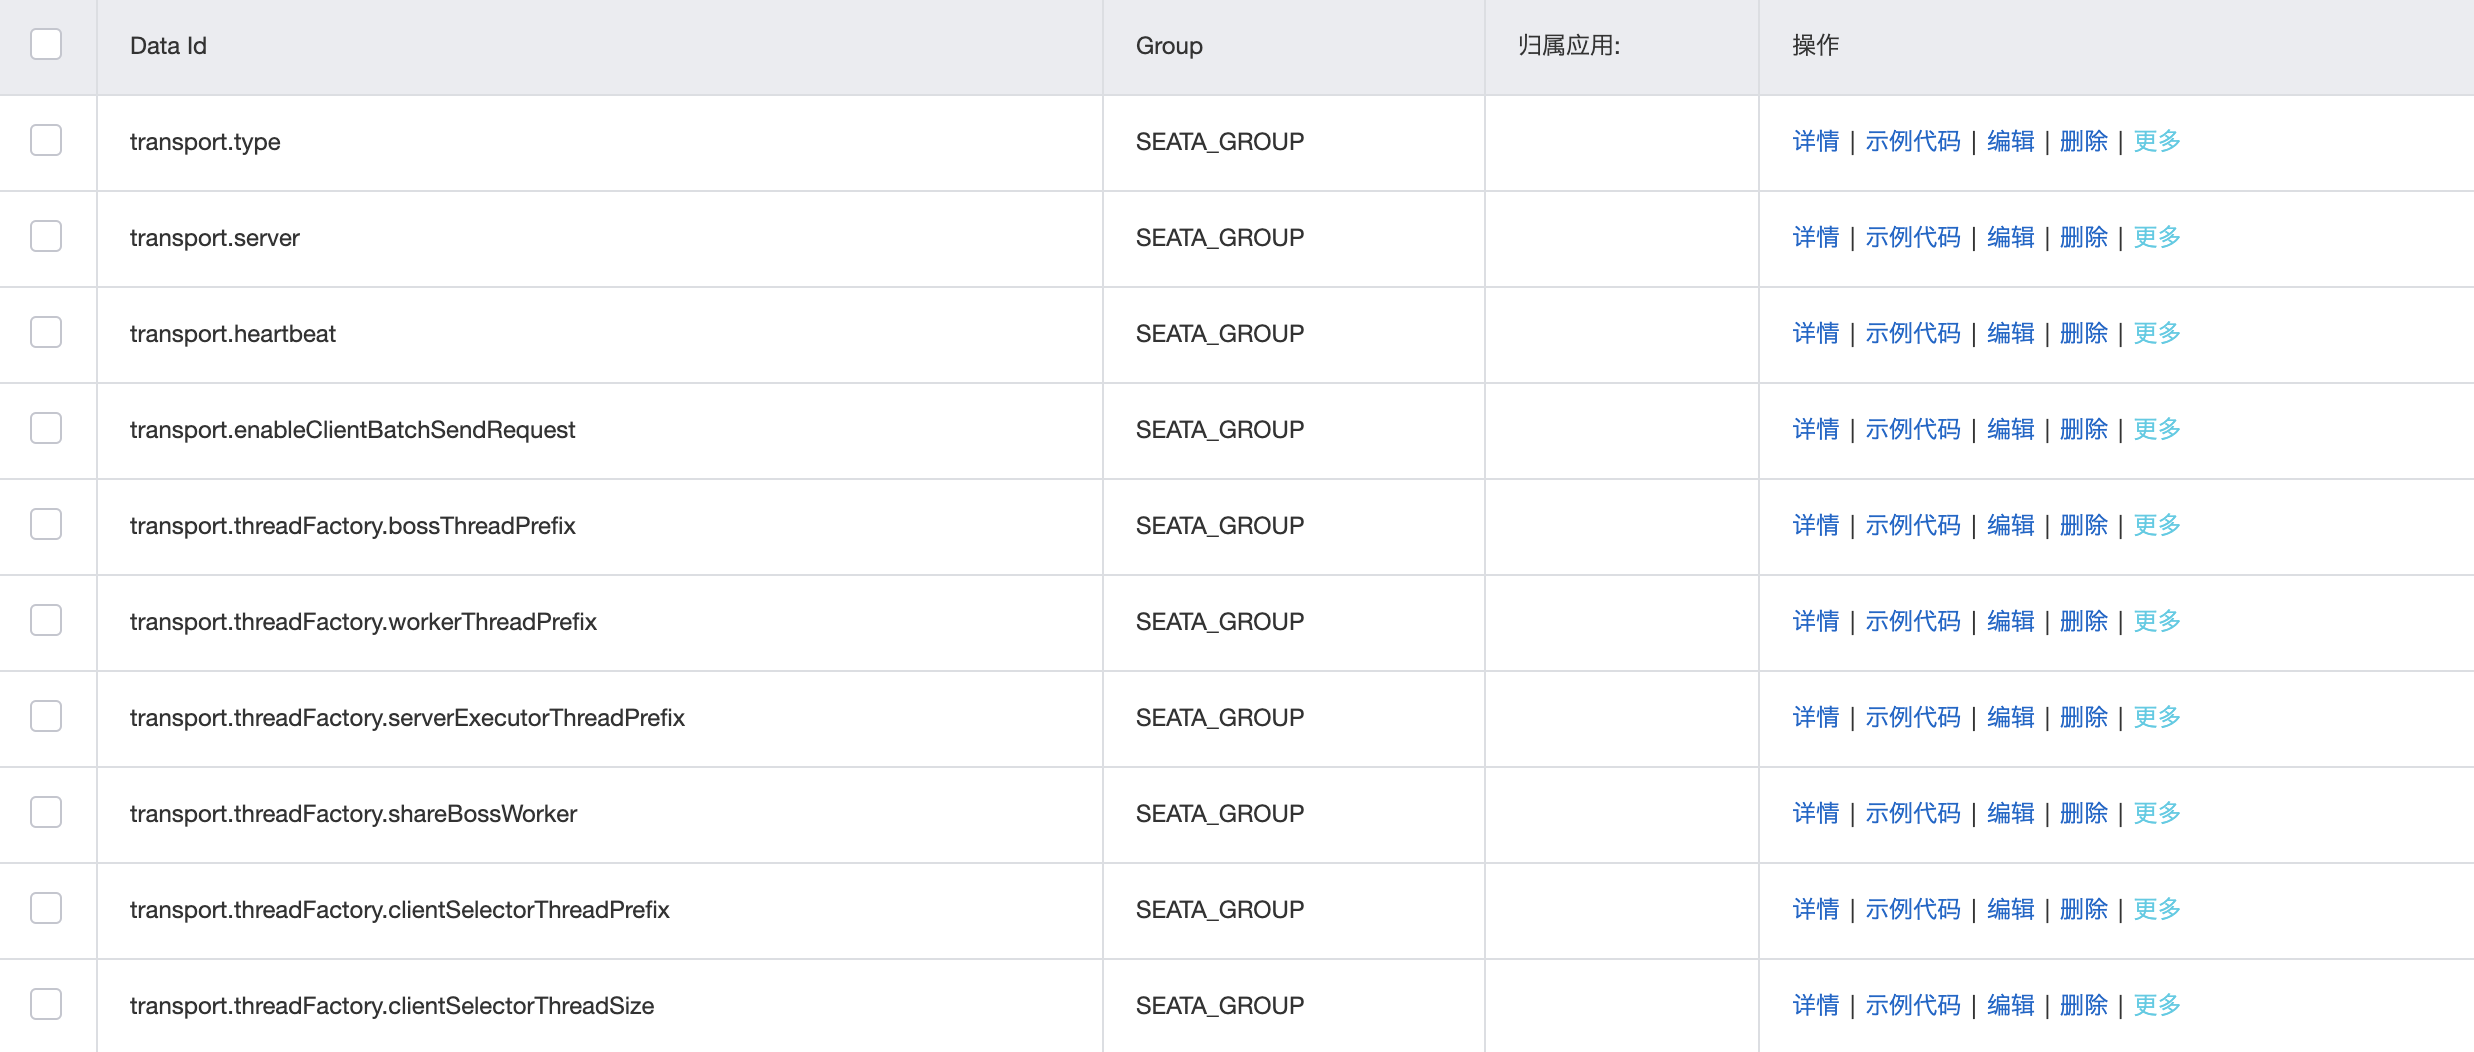
执行脚本,将config.txt中的配置信息上传到Nacos配置中心
> sh nacos-config.sh -h localhost -p 8848 -g SEATA_GROUP -t a02ea230-9d39-4392-89f2-04f5fc0684c0 执行完成后会看到以下信息
......
Set client.undo.compress.threshold=64k successfully
Set log.exceptionRate=100 successfully
Set transport.serialization=seata successfully
Set transport.compressor=none successfully
Set metrics.enabled=false successfully
Set metrics.registryType=compact successfully
Set metrics.exporterList=prometheus successfully
Set metrics.exporterPrometheusPort=9898 successfully
=========================================================================
 Complete initialization parameters,  total-count:84 ,  failure-count:0
=========================================================================
Init nacos config finished, please start seata-server. 在配置中心查看,可以看到配置列表,在列表中修改配置
- 启动三个服务,启动完成后,在seata-server后台log能看到注册信息
5. 验证分布式事务
5.1 不用Seata的场景
- 执行下订单的接口
- 用户“1”买10件产品“1”,花费10元
curl http://localhost:2001/order/create?userId=1&productId=1&count=10&money=10- 执行以后会看到以下信息
{"code":200,"message":"订单创建成功","data":null}- 查看数据库的变化
- 订单表下单的内容

- 库存表已消耗10件,剩余90件

- 账户表消费10元,剩余990元

停掉账户服务模拟宕机异常
执行下订单接口,会报以下异常
Load balancer does not have available server for client: seata-account-service- 再次查看数据库的变化
- 订单表增加了一个新订单

- 库存表又消耗10件,剩余80件

- 账户表没有任何变化

问题出现了:库存扣减成功,但没有收到钱(˶‾᷄ ⁻̫ ‾᷅˵)
5.2 使用Seata后的场景
- 在下订单的方法上添加
@GlobalTransactional注解
@Override
// 重点!!!
@GlobalTransactional
public void create(Order order) {
  log.info("---新建订单--->");
  orderDao.create(order);

  log.info("---订单微服务开始调用库存,做扣减Count--->");
  storageService.decrease(order.getProductId(), order.getCount());

  log.info("---订单微服务开始调用账户,做扣减Money--->");
  accountService.decrease(order.getUserId(), order.getMoney());

  log.info("---修改订单状态--->");
  orderDao.update(order.getUserId(), 0);

  log.info("下单成功(^_^)v");
}- 正常情况不再演示,与上述不用Seata的场景一样
- 将账户服务停掉模拟宕机场景,执行下单接口
curl http://localhost:2001/order/create?userId=1&productId=1&count=10&money=10 这时候会报以下异常
Connection refused (Connection refused) executing POST http://seata-account-service/account/decrease?userId=1&money=10- 这时候查看数据库的变化
- 订单表没有新增订单

- 库存表没有扣减库存

- 账户表也没有扣减金额

完结 o(≧v≦)o~
本博客所有文章均为原创,转载请注明出处!